
 eins' blog entry
a loose guide on how i make cherry head mods
posted: march 29 2025
last updated: may 31 2025
it's here! the long awaited cherry head modding tutorial...
but for real, i've noticed quite a few times that (maybe) the biggest drawback people have to Tonic Legacy's Cherry Head, especially creating for it, is that they have no idea how to mod for it. there's not really a comprehensive guide on how to mod for this head (unless there's a notecard or something included in the package that i've forgotten about, but it's difficult regardless), and even i remember fumbling my way through figuring out this head a lot before finally becoming pretty comfortable with the modding process. i basically had to kind of just go in and trial-and-error everything repeatedly until i figured it out.
and what's more, there's a few things i know now that i wish i had known way back when i had just started modding for this head.
i will include these tips and resources in this tutorial in hopes that it makes things a little easier for everyone, and i hope it inspires you to create your own mods for cherry head as well!
for now, i will only be covering how to make eyes in this tutorial, because every other mod is relatively more of a simple process once you know how to make the eyes... though i may quickly go over other parts later if needed (likely the head skin, since it's slightly different).
please also keep in mind that aside from the technical things (such as putting the textures into the applier), this is not the only way to make an eye mod for cherry head! some people draw differently and format their layers differently from me, and that's perfectly okay, as long as it works for you!
download cherry head modding resources here...
has placement guides, symmetry guides, and a small tip video for the eyes from my friend chey!! ^_^
*eye and eyebrow placement guides have been updated to be more accurate, and to include lines on all sides showing you where the texture cuts off! stay within the blue and green lines, and you'll be fine!
IMPORTANT NOTE: the "alchemy" client seems to sometimes have issues with how they compress/upload images with transparency. i highly suggest you use the "firestorm" client to upload these textures instead, otherwise they may not function properly on the head and become invisible at certain angles.
(i have heard this issue has been fixed in alchemy recently, but i will keep this note here just in case.)
Additionally, specifically when making head skins, please make sure the head skins do not have any transparency/alpha channels when exporting the file.
starting off, let's get our guide open. this is definitely something you want to have open, because just guessing the placement is probably going to be really tedious and painful for you.
you will probably have to end up doing some adjustments later anyways, but the placement guide should at least severely lessen the amount of trial-and-error you'll have to do.
you don't need to worry about the messed up layering of the default eyes on this guide; they are merely there for a loose guide on where to place the eyes.
the middle red line, between the eyes, is to aid in symmetry in your eyes.
the blue lines that are above and below the eyes, is the absolute highest and lowest you can draw your eyes. any drawings that dont stay within those blue lines will get cut off.
similarly, the green lines on the left and right are the absolute farthest you can go on the sides, and anything that doesnt stay within those lines will get cut off.
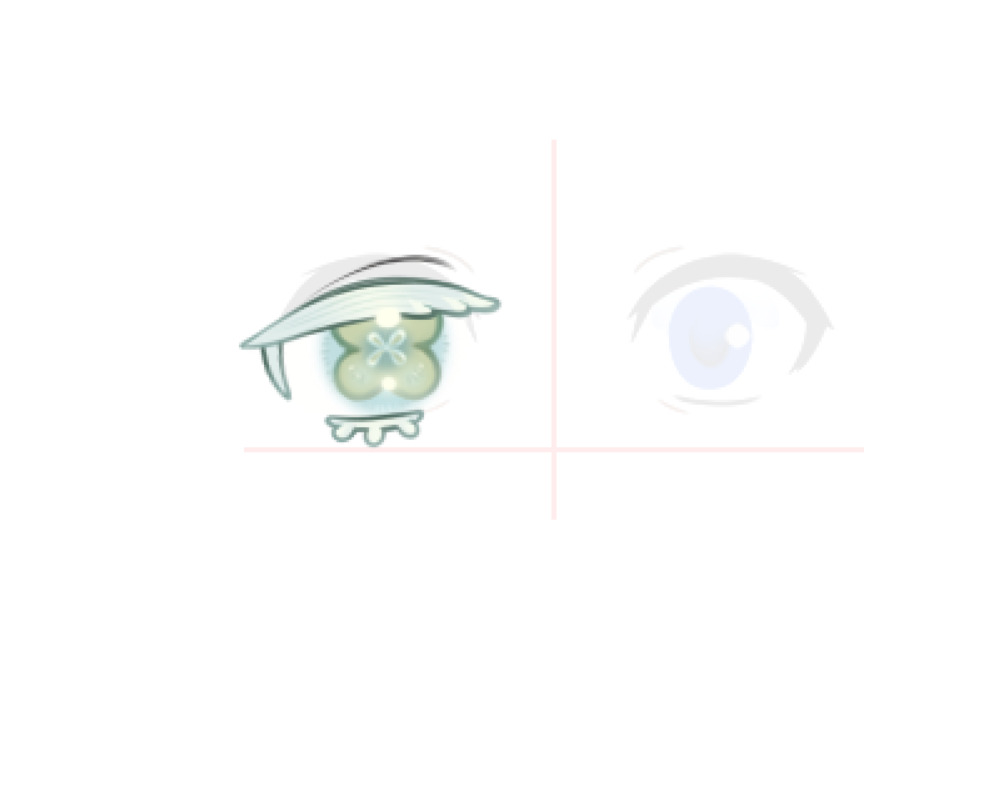
now that we know this, let's draw our left eye. (you can start with the right eye if you prefer, it doesn't really matter.)
i also separate the different parts of the eye so i can move them around easily; because you will essentially be drawing animation frames for a blink motion.
if you have done live2d rigging before, this may seem familiar to you.
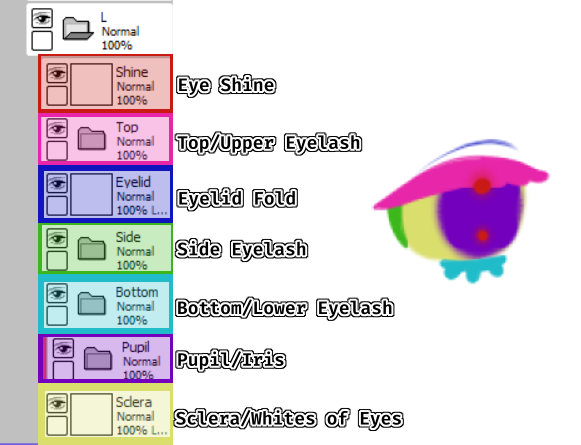
this is how i personally separate my layers.
i do this so i can open and close the eyes more easily, alone with move the pupil/iris in different directions.
typically, i will clip the pupil/iris onto the sclera/whites of the eye. this is just my personal preference.
(also, you don't need to do it like this. some people draw every blinking frame by hand, individually. that's okay too, i'm just lazy!)
now if you're happy with your left eye, go ahead and copy and flip it to the right side. (this is what the placement guide comes in handy for)
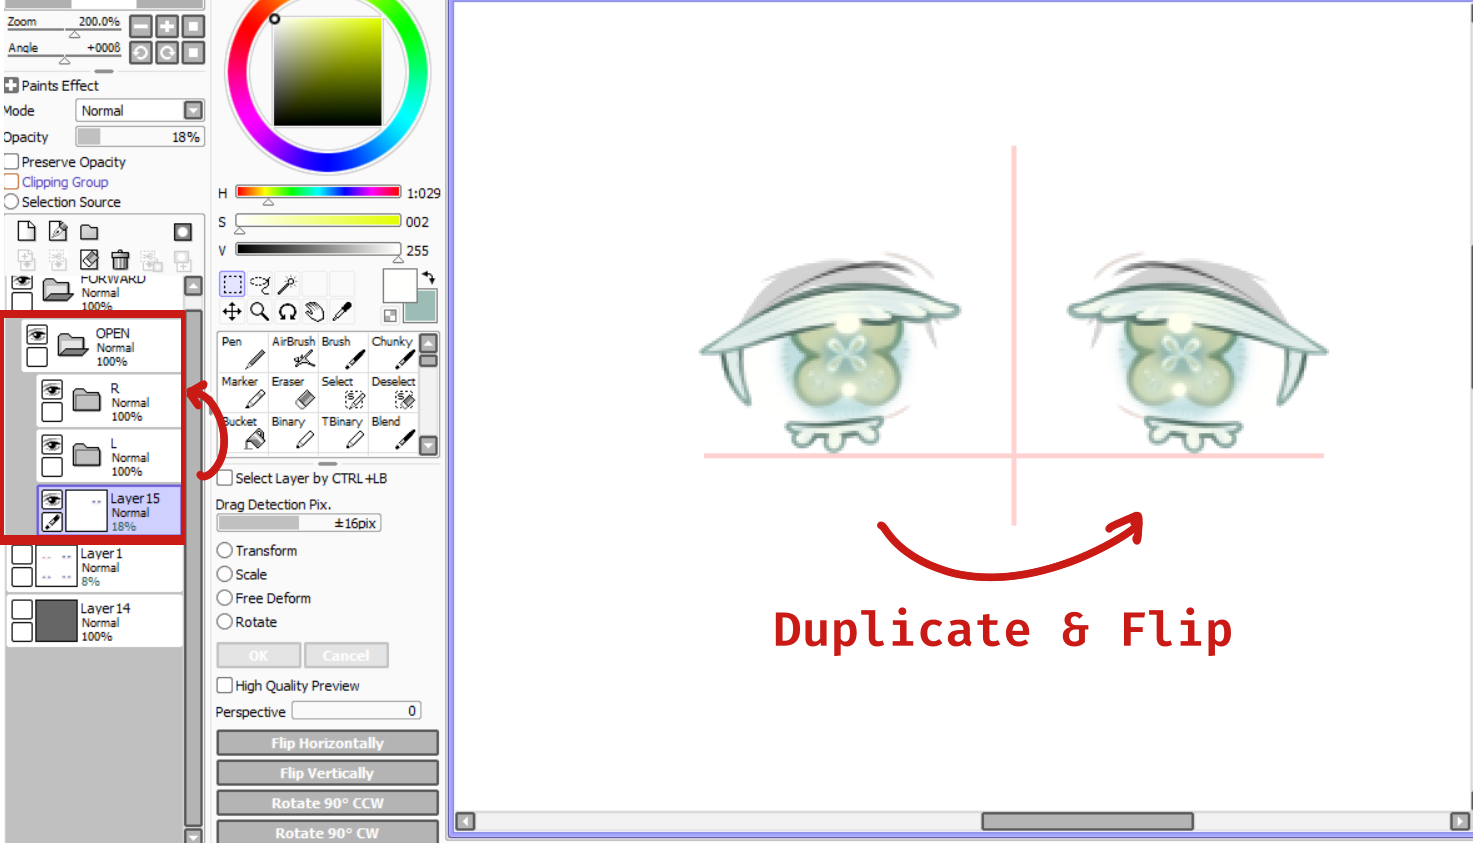
i reccommend you keep the right and left eye separate instead of merging them together, in case you need to make further adjustments later.
if you're happy with everything at this point, now you can create the animation for the blinking motion.
because of how i formatted my layers, i can do this easily by moving the upper eyelash and lower eyelash layer in each frame.
(please don't forget to check your other layers to make sure they're not sticking out after you move these parts! i personally forget to adjust the size of the sclera/whites of the eyes when doing this.)
and with this, you're done with the "looking forward" eye state.
from this point on, i highly recommend you do not make the other eye states yet.
right now, you should export your "forward" eye state to a PNG file. (make sure the file keeps the transparency/alpha channels)
(IMPORTANT NOTE FOR EXPORTING IMAGE FILES: if you use Clip Studio Paint, there is a known issue where exporting images with transparency from Clip Studio Paint will make the image have a strange white outline in some programs. this unfortunately includes secondlife, so when exporting your image files, it would be a good idea to import them into a different art program, i.e. Paint Tool SAI or Krita, and re-export them there. here's also someone else explaining it, in case my explanation makes no sense.)
this is because we're going to import it into SL and test the placement of the eyes onto the actual cherry head.
this is important to do, because the eyes on your drawing canvas will almost never look the same as it does on the cherry head in-game.
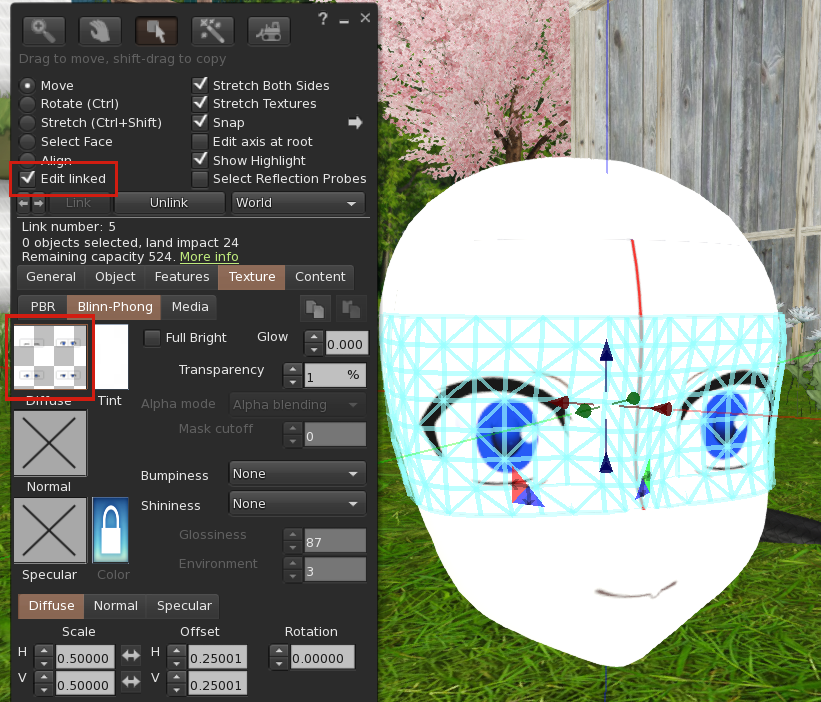
the simplest way to test the PLACEMENT of your eyes is to rez a cherry head on the ground, right click > edit, go into the "content" tab, and delete the "001HeadControl" script. then you can select the eyes by making sure "edit linked" is checked and selecting this prim on the head, and then just test the texture regularly with local textures.
HOWEVER, if you want to test the animation of your eyes too (which you should), then you will need the UUID of your image so you can put it in an applier, which you can typically only obtain by uploading the image.
you may be troubled if you do not have a premium subscription on SL, because each image upload costs 10$L, and that might get expensive when having to make multiple adjustments.
don't worry, there is a product for that.
this "local texture UUID hud" will allow you to generate a temporary UUID with a locally uploaded texture.
again, i am exaggerating that this is a temporary UUID. you cannot use this UUID for your final product, as it will no longer work once you log off.
please also note that the temporary local UUID texture will cease to work if you update/change the PNG file you're using, so you will have to generate another temporary UUID and update it in the applier when this happens.
attach the HUD, right click > edit the HUD, then go to the texture section. make sure you're on blinn-phong, and locally upload your texture.
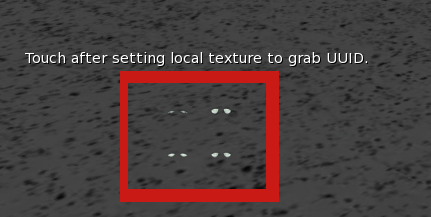
once you've done that, the local texture should show up in the HUD, as pictured above.
you can then click directly onto the local texture in the HUD, and it should put out your temporary UUID in the local chat like so:

(don't worry, no one can use this UUID to steal your texture; it's still a local texture, and is stored in your client-side cache for only your current log-in session.)
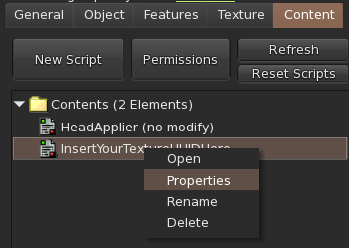
now you can get your empty eyes applier from the devkit provided with cherry head, and rez it on the ground.
right click > edit the applier. go to the "contents" tab, and right click > open the script named "InsertYourTextureUUIDHere"
when the script opens, you will paste your temporary UUID into the script.
make sure the UUID is between the quotation marks, like so. ("")
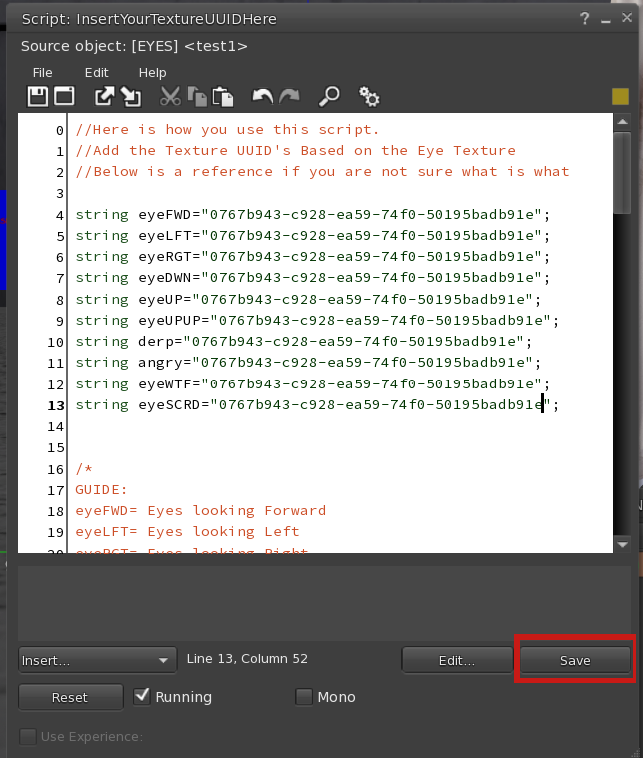
the script will not work if you leave the other quotations blank, so for now, you can just copy paste the temporary UUID into all of them.
when you're done, press "save" and exit the edit/build menu. right click > take the applier.
now make sure you have your cherry head on, and "add" your test applier. click "both" to apply it to both eyes. it should then show up normally on your face like so:
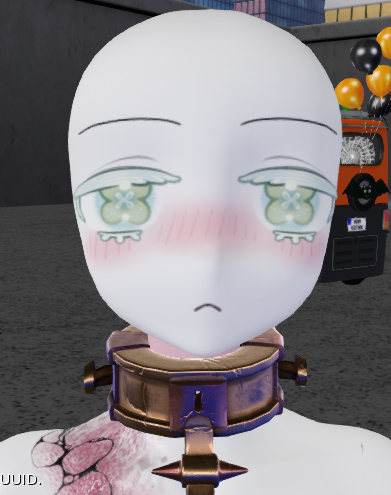
as you can see, the eyes need to be adjusted. this is why we only completed the "forward" state of the eyes earlier.
please do adjustments in the drawing file, and keep testing them as needed in-game with the same process i just explained.
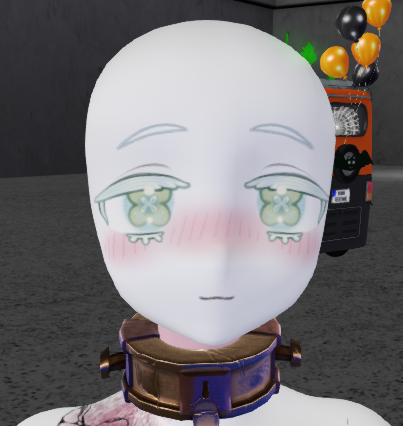
now i am happy with the placement and size of my eye mod.
at this point, i can go back to my drawing file, and create the other eye states of the mod.
i won't show you the whole process of this, it's more or less the same, just moving things around, for example, i'll move the pupils/irises left and right for the "left" and "right" eye states.
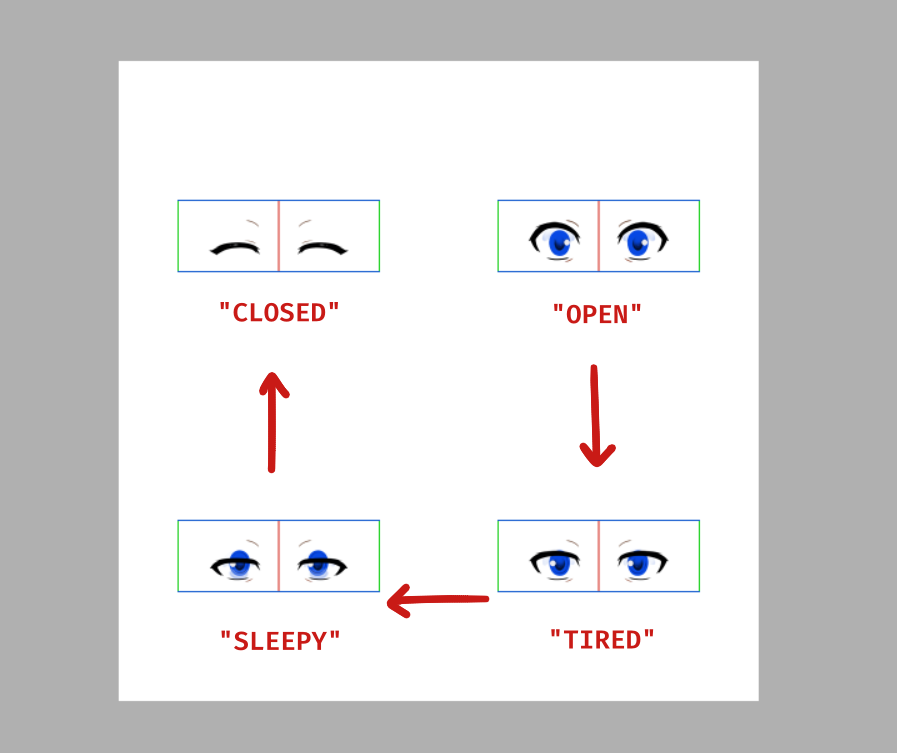
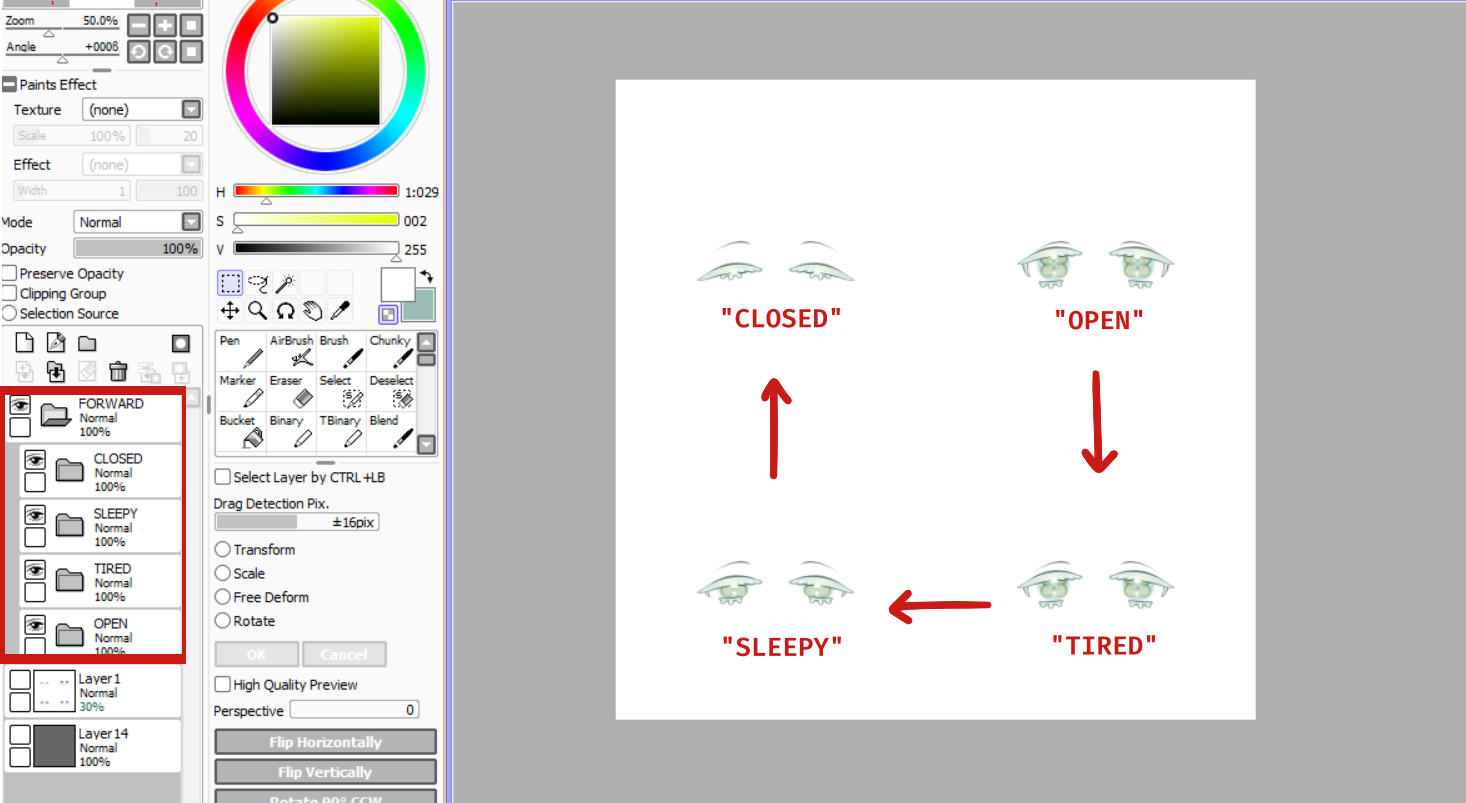
here are all of the normal/directional eye states that you will need to make:
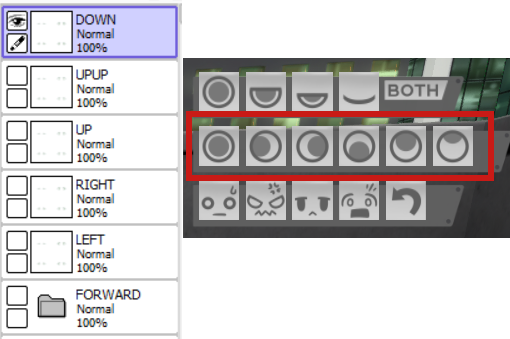
and here are the special expression eye states that you will need to make:
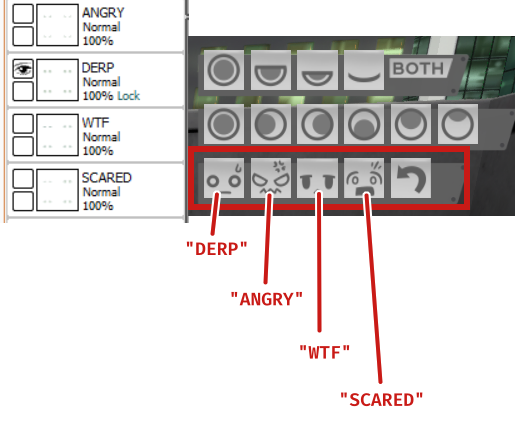
please make sure all directional and special expression eye states are all saved as separate images.
if you have made every eye state, you should have 10 different images.
after you have created all of the eye states and are happy with them, we can get to completing your cherry head mod.
you will now need to fully upload all of the eye state images.
like i mentioned earlier, if you do not have a premium subscription, this will mean you will need to pay 10$L for each image. this will amount to 100$L total.
once you've done that, please go ahead and rez a new, empty eye applier onto the ground, and right click > edit it.
these steps are mostly important if you are selling your eye mod or sharing it with others; to prevent theft, but i honestly suggest you do them anyways just in case.
apparently it says somewhere not to change the "[EYES]" part of the object name, but i have found that it does not affect how the applier works in any way. you can change it to whatever you like. as you can see here, i changed it to my store name, then the product name.
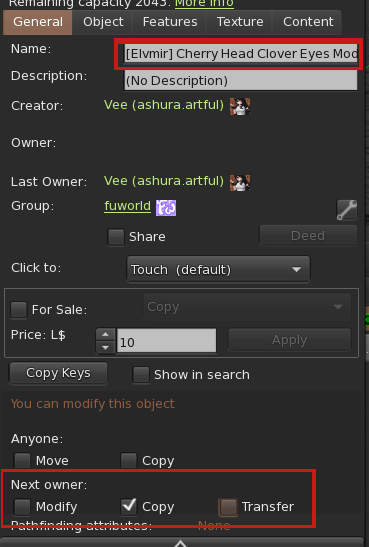
the more important part is at the bottom, in the "next owner:" section.
please make sure that "modify" and "transfer" are not selected.
then, please go to the "contents" tab, right click the "InsertYourTextureUUIDHere" script, and then click "properties"
then, similarly to earlier, go to the bottom, in the "next owner:" section.
again, please make sure that "modify" and "transfer" are not selected.
now, you can open the "InsertYourTextureUUIDHere" script, and similarly to when you were testing your eye placement, you will be inserting the UUIDs of your newly uploaded images.
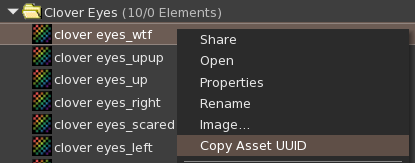
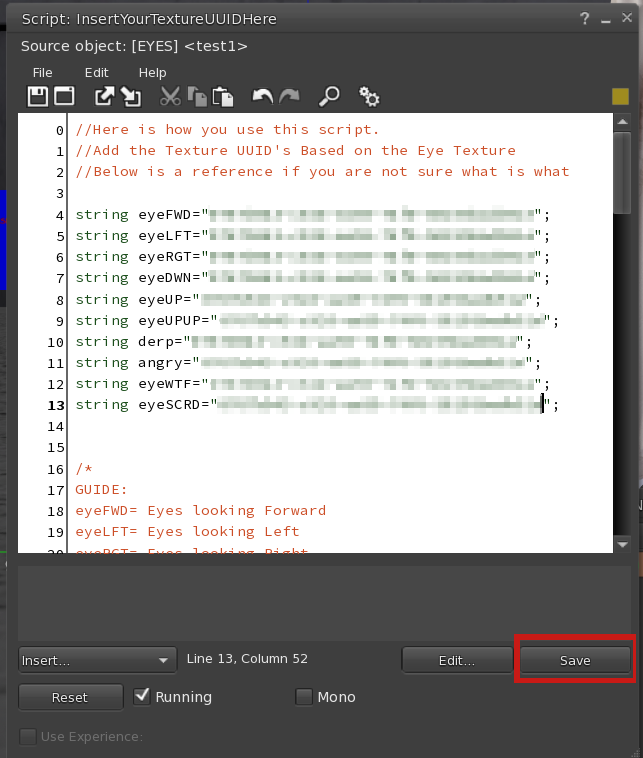
right click your images and click "copy asset UUID." paste and fill in the UUIDs in the script accordingly to their names. again, make sure that they are between the quotation marks ("").
it should be self-explanitory, but i will include a guide here:
eyeFWD = forward
eyeLFT = left
eyeRGT = right
eyeDWN = down
eyeUP = up
eyeUPUP = upup
derp = derp
angry = angry
eyeWTF = wtf
eyeSCRD = scared
please make sure that no one sees the UUIDs of your newly uploaded images. the images can be stolen from these UUIDs because they are uploaded, and no longer client-side/local.
after you have done all that, and pressed "save," you can close the edit/build menu and right click > take your applier!
your eye mod should be finished now. you can apply it to your head normally. make sure you test all of the directionals and special expressions after you have applied it to make sure they're all functioning properly.